What Does 1/16 on a Tape Measure Mean? A Clear Guide
Understanding 1/16 on a tape measure is crucial for anyone involved in construction, woodworking, sewing, or DIY projects. This smallest standard increment allows for accurate measurements that ensure clean cuts, proper fits, and professional results. Without mastering this detail, even experienced builders can make costly mistakes.
Moreover, the 1/16 on a tape measure appears as the shortest line between every inch mark. It divides each inch into sixteen equal parts. This level of precision matters when aligning tiles, framing walls, or installing cabinetry where fractions of an inch affect the final outcome.
In addition, reading these tiny marks correctly prevents cumulative errors. For example, being off by just 1/16” per cut over ten joints adds up to more than half an inch. That small gap can ruin symmetry and structural integrity.
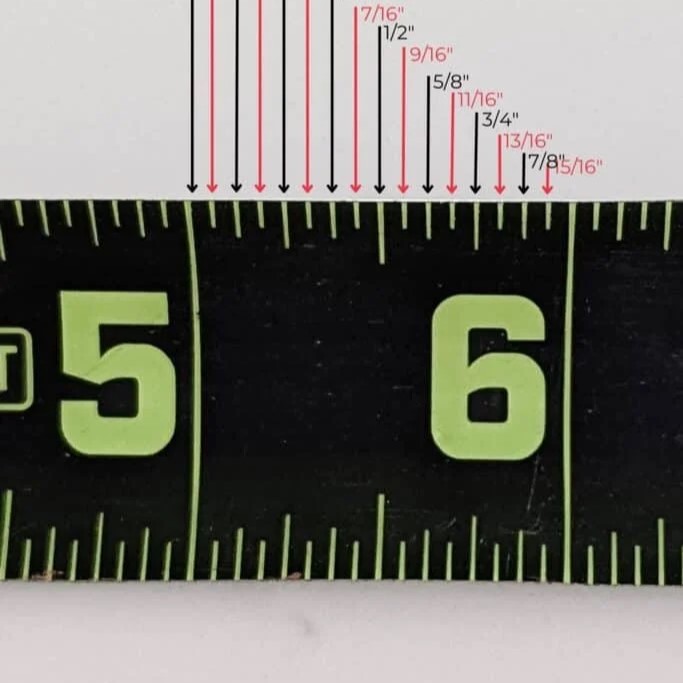
Also, different tape measures highlight the 1/16 on a tape measure in various ways. Some use bold black lines. Others rely on contrast against a yellow or white background. Familiarity with your specific tool improves accuracy.
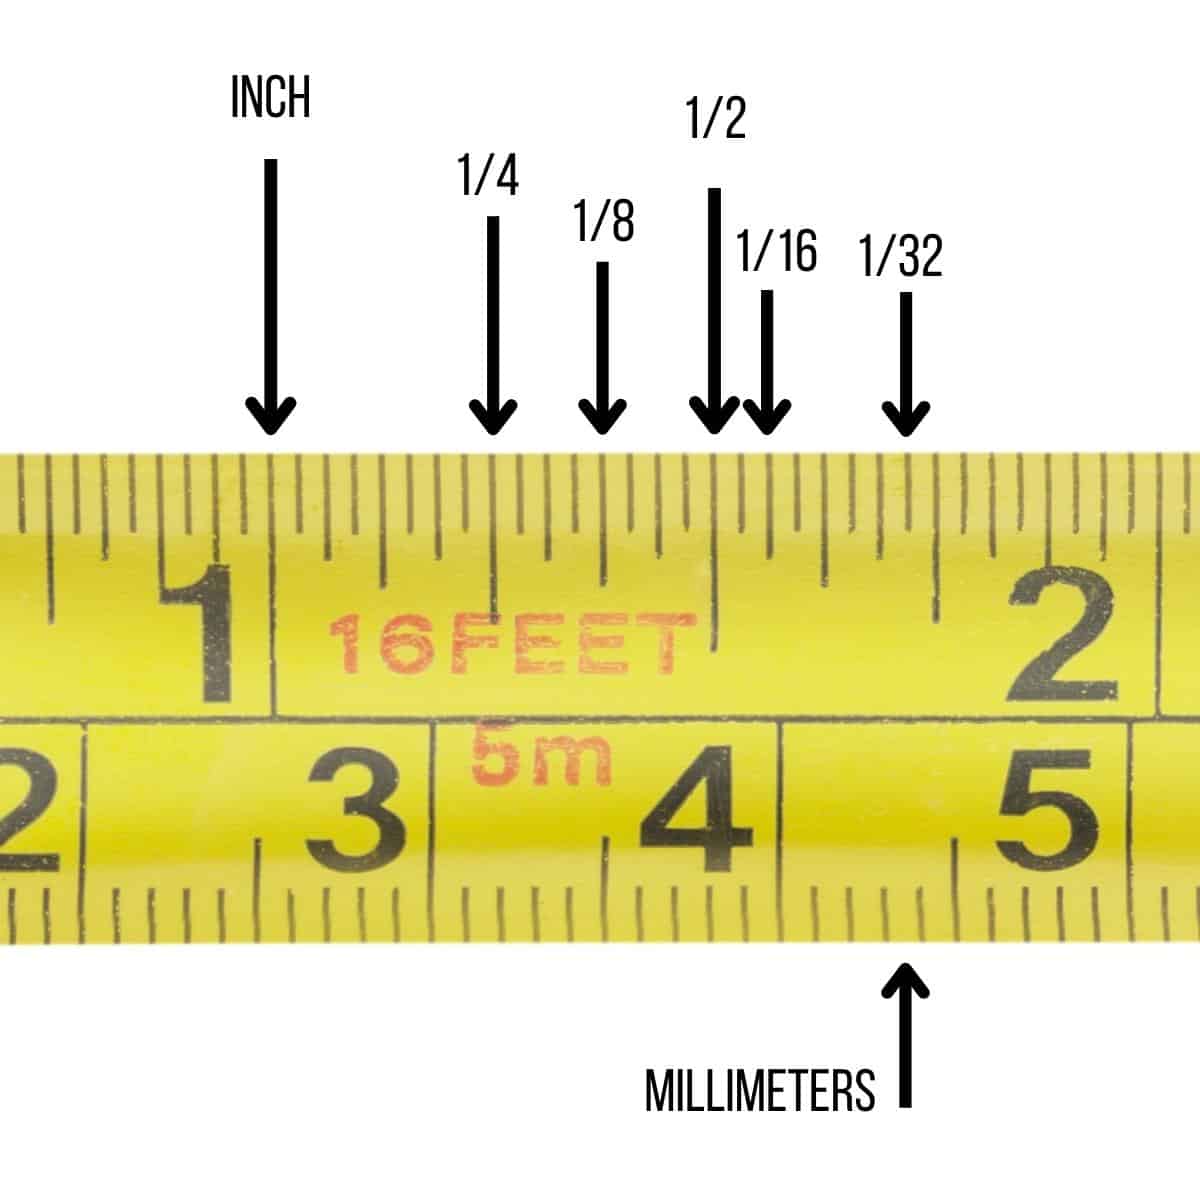
Furthermore, dual-scale tapes include metric equivalents. While 1/16” equals about 1.5875 mm, most users stick to imperial units in the U.S. Knowing both systems expands versatility.
Learning how to count from zero helps avoid misreads. Start at the nearest whole inch. Then count each short mark until you reach your point. Practice builds confidence.
Ultimately, the 1/16 on a tape measure represents attention to detail. It turns rough estimates into exact dimensions. And for any project demanding precision, it’s not just useful—it’s essential.
Contents
hide
 Why Accuracy Matters When Using 1/16 on a Tape Measure
Precision plays a vital role in successful building. A difference of 1/16 on a tape measure might seem minor. However, repeated inaccuracies lead to misaligned shelves, crooked trim, or doors that won’t close.
Also, materials expand and contract. Wood swells with humidity. Metal shifts with temperature. Therefore, allowing for slight adjustments based on 1/16” increments ensures long-term fit.
Carpenters often say “measure twice, cut once.” This rule relies heavily on reading the 1/16 on a tape measure correctly. One wrong read means wasted time and resources.
In manufacturing settings, tolerances are even tighter. Yet, many shop floors still use 1/16” as a baseline. It offers enough resolution for general fabrication.
Tile installers benefit greatly. Setting spacers to 1/16” ensures even grout lines. Misalignment becomes obvious if one side is wider.
Framing crews check stud placement using 1/16” increments. Off-center nailing weakens connections. Proper spacing supports structural strength.
Sewing and tailoring also depend on fine measurements. Garments require precise seam allowances. Being off by 1/16” alters drape and fit.
Even painting benefits. Masking tape applied with 1/16” gaps creates uneven edges. Clean lines come from careful measuring.
Therefore, respecting the 1/16 on a tape measure elevates work quality. It separates amateur efforts from professional finishes.
How to Read 1/16 on a Tape Measure Step by Step
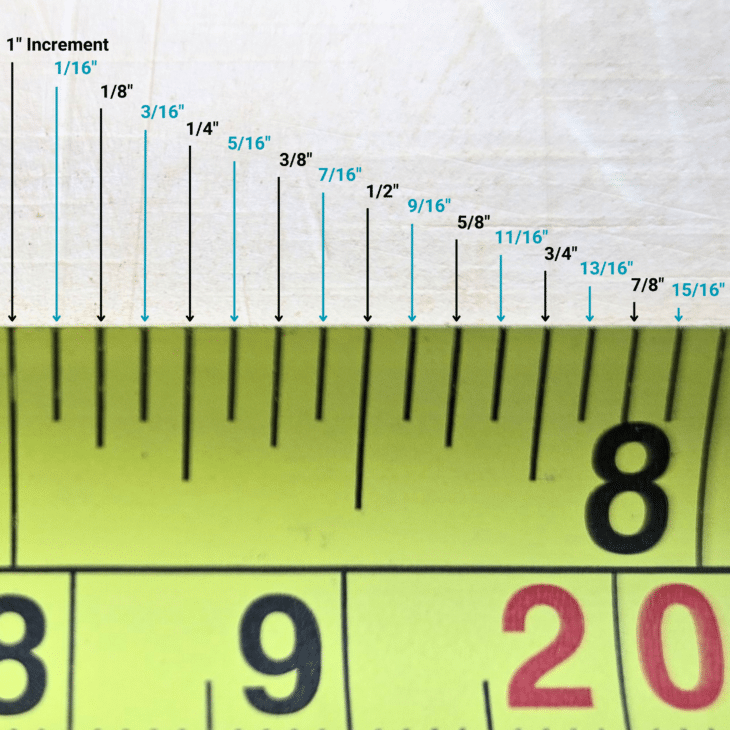
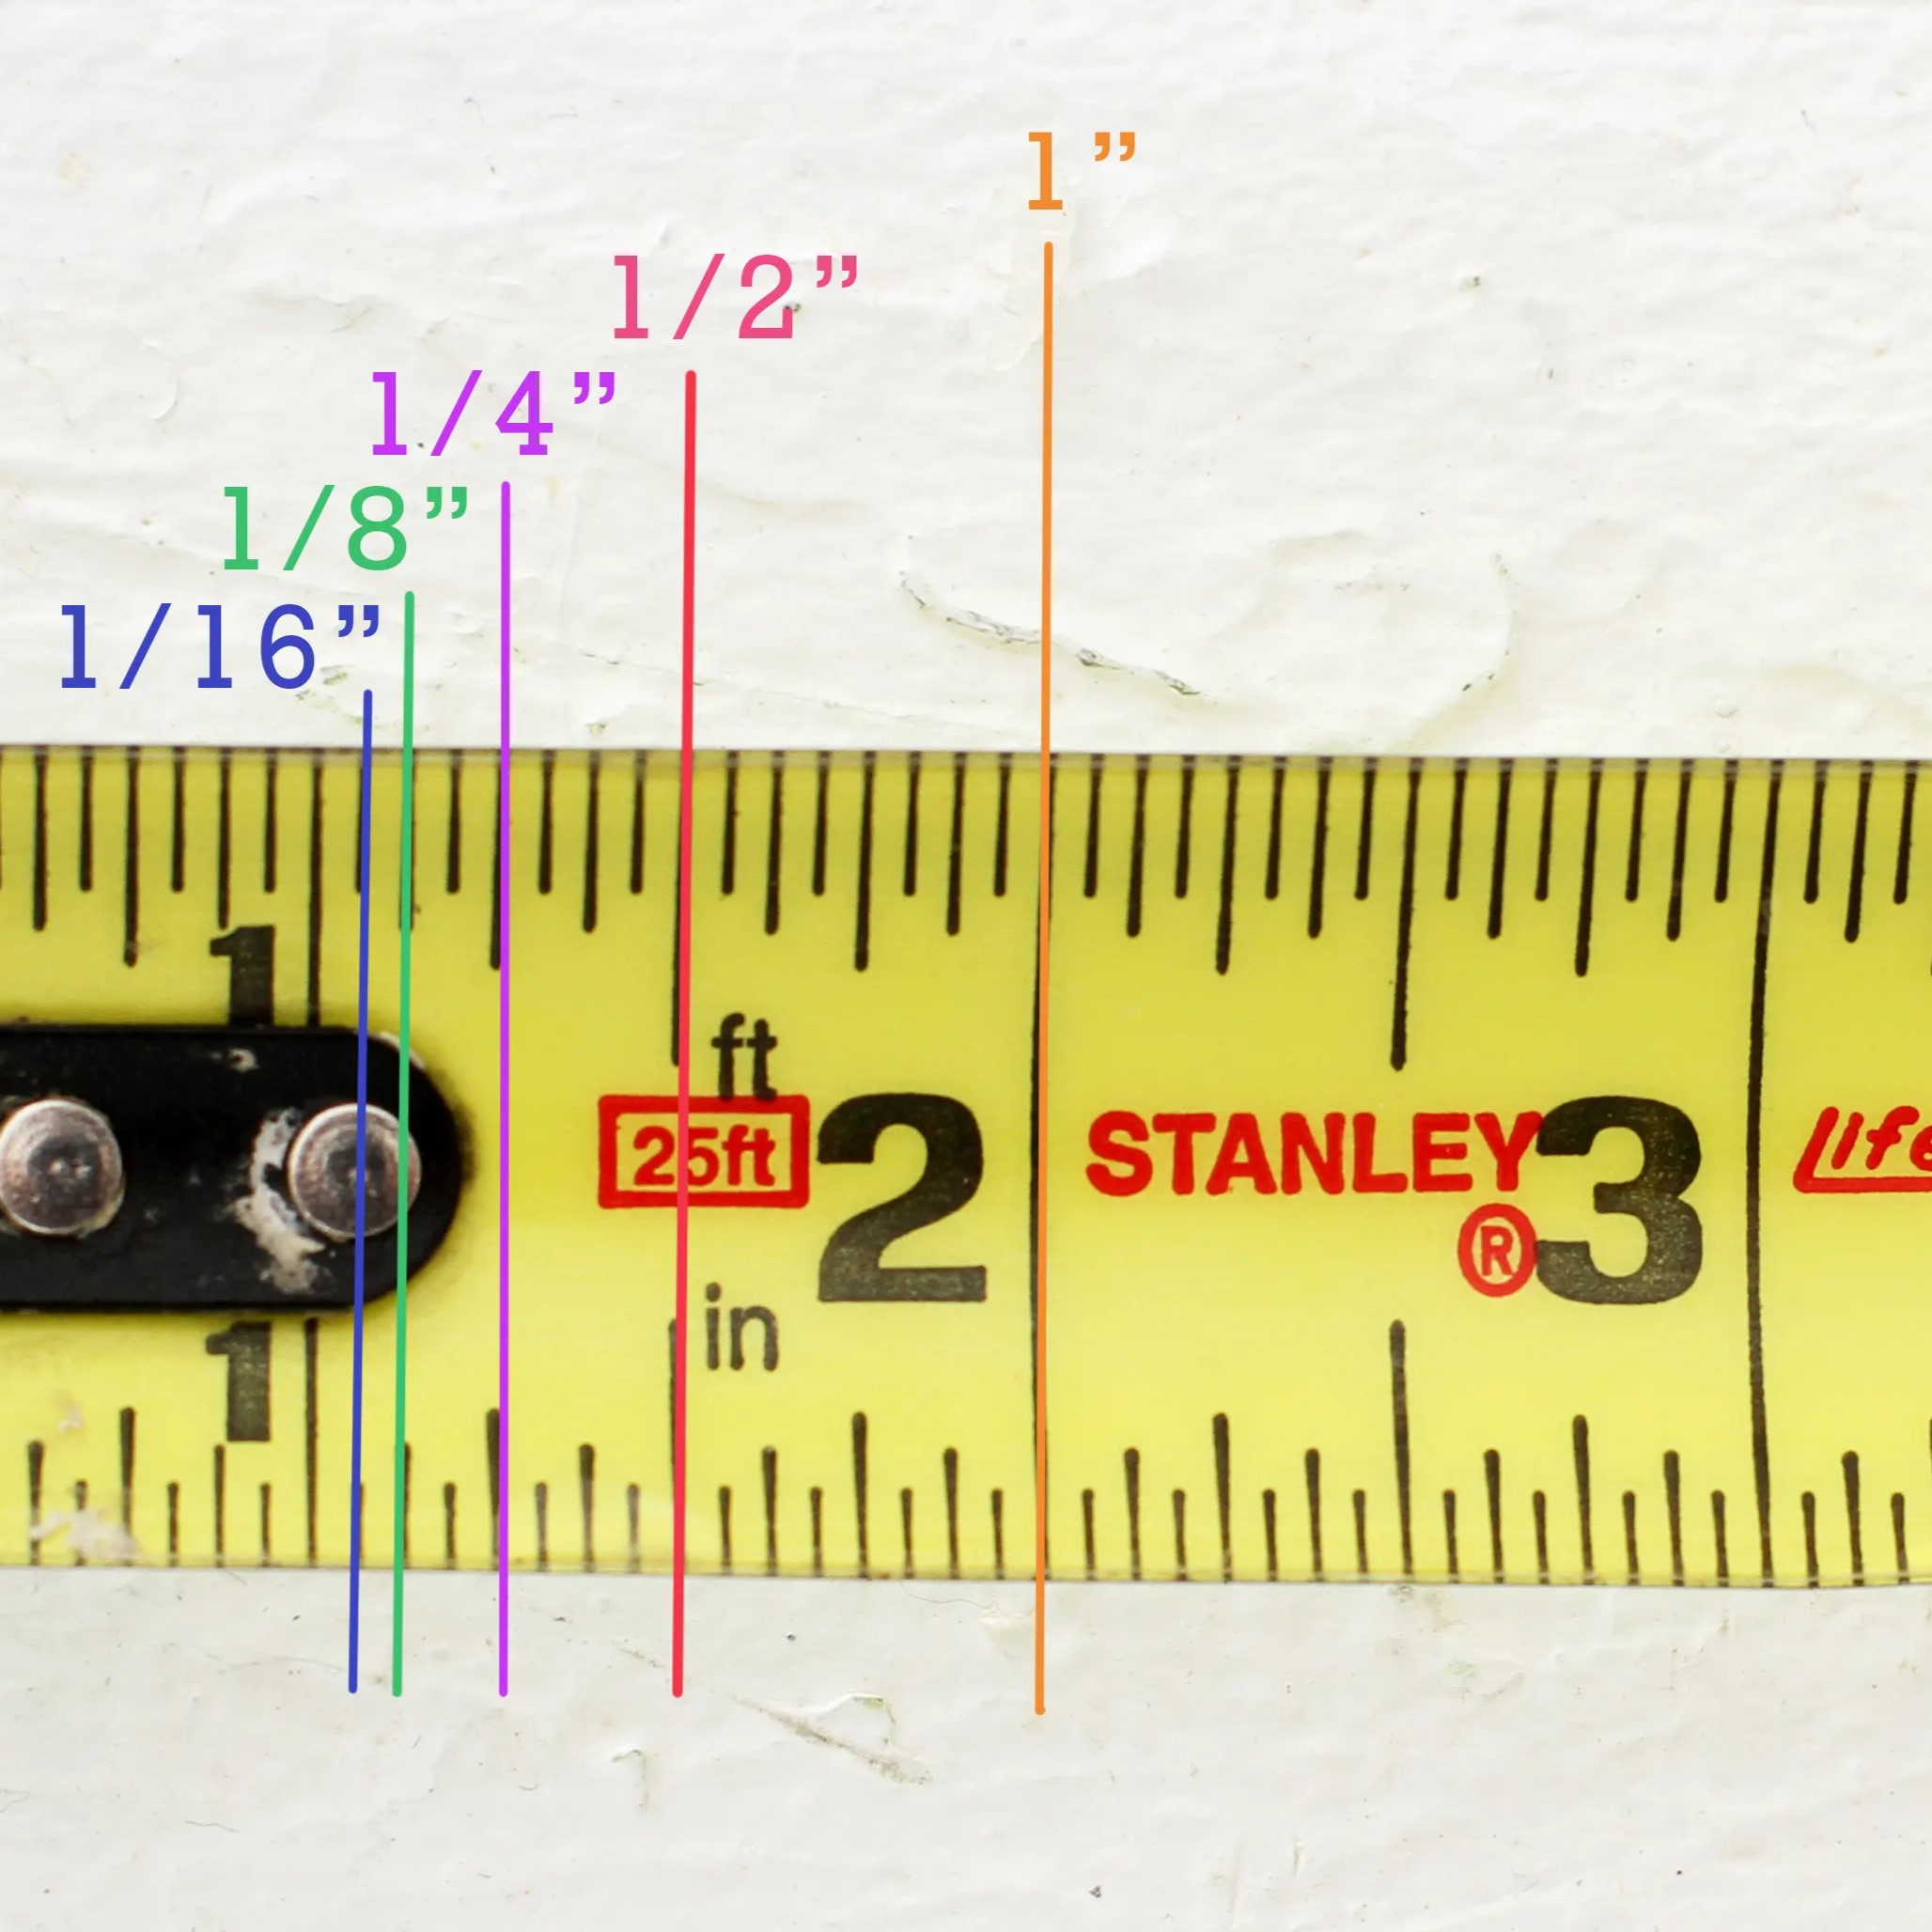
Start by locating the inch marks. These are the longest lines labeled with numbers. Each number represents one full inch.
Next, find the second-longest lines. These indicate half-inches (1/2”). They sit exactly between each inch.
Then look for slightly shorter lines. These show quarter-inches (1/4”). There are two between each half-inch.
Eighth-inch marks follow. These appear midway between quarters. Four exist within each inch.
Now focus on the shortest lines. These represent 1/16 on a tape measure. Sixteen fit inside one inch.
Count them carefully from left to right. The first short line after zero is 1/16”. The second is 2/16”, which simplifies to 1/8”.
Continue counting:
3/16”, 4/16” (1/4”), 5/16”, 6/16” (3/8”), 7/16”, 8/16” (1/2”).
After the half-inch, repeat the pattern:
9/16”, 10/16” (5/8”), 11/16”, 12/16” (3/4”), 13/16”, 14/16” (7/8”), 15/16”, then 16/16” (1 inch).
Use a magnifying glass if needed. Older eyes may struggle with fine print. Many tapes now offer large-number versions.
Practice daily. Hold the tape at eye level. Avoid parallax error by viewing straight on.
With repetition, recognizing 1/16 on a tape measure becomes automatic. You’ll no longer need to count every line.
 Common Mistakes
One frequent error is misreading 1/16” as 1/8”. The lines are close in size. Beginners often skip ahead without counting.
Another issue is starting from the wrong point. Some users begin at the metal hook’s edge instead of the actual zero. This causes consistent under-measurement.
Parallax distortion happens when viewing the tape at an angle. The mark appears shifted. Always look directly down at the measurement.
Failing to lock the blade leads to movement. The tape retracts mid-measure. This breaks concentration and invites mistakes.
Dirt or wear obscures markings. Old tapes lose ink clarity. Replace them before critical jobs.
Confusing numerator and denominator occurs too. Saying “16 over 1” instead of “1/16” shows misunderstanding. Clarity prevents communication errors.
Some assume all tapes are identical. However, brands vary in line length and color. Learn your specific model.
Estimating instead of measuring wastes effort. Guessing 1/16” defeats the purpose of precision tools.
Using worn or bent hooks distorts readings. The end moves incorrectly. Inspect it regularly.
Finally, rushing causes oversight. Take your time. Double-check before cutting or drilling.
Avoiding these pitfalls ensures reliable results. Attention to 1/16 on a tape measure pays off.
Tools That Help Improve Accuracy
Digital calipers provide exact fractional readings. They display 1/16” clearly on an LCD screen. Ideal for small parts and metalwork.
Magnifying tape measures enlarge the scale. Built-in lenses help older users see 1/16 on a tape measure easily. Great for dim job sites.
Laser distance measurers reduce human error. They calculate distances electronically. Still, verify with a physical tape for setup.
Self-adhesive ruler strips attach to saw guides. These show 1/16” marks near the blade. Alignment improves during repetitive cuts.
Tape measure holders clip to belts or magnets. They keep the tool ready and prevent drops. Less handling reduces wear.
Scribe tools mark wood precisely. Slide the tape’s hook into the notch. Draw a clean line at the exact 1/16” point.
Highlighter tape marks key measurements. Apply colored labels at common lengths. Quickly identify 16”, 32”, or 48” intervals.
Chalk lines snap straight references. Set them using 1/16”-accurate points. Ensure walls or tiles stay aligned.
Angle finders pair with tapes. Measure slopes and transfer angles accurately. Useful for roofing or trim work.
Even smartphone apps simulate rulers. Calibrate them properly. Use only for non-critical tasks.
Each tool supports better use of 1/16 on a tape measure. Combine them for maximum precision.
Where 1/16 on a Tape Measure Is Most Critical
Woodworking demands extreme precision. Cabinetmakers align face frames to within 1/16”. Gaps ruin aesthetics and function.
Flooring installers use it daily. Laminate and hardwood planks must fit tightly. Uneven spacing shows immediately.
Metal fabricators rely on it. Sheet metal bends require exact flange lengths. A 1/16” error affects assembly.
Plumbing layouts include 1/16” tolerance. Pipe offsets and drain slopes depend on accurate slope per foot. Small changes impact flow.
Electrical box placement follows stud patterns. Centered boxes simplify drywall work. Misplaced ones require patching.
HVAC technicians measure duct runs closely. Custom fittings need exact dimensions. Leaks occur if pieces don’t seal.
Masonry uses joint spacing around 3/8”. But brick coursing depends on 1/16” alignment across rows. Stagger matters.
Drywall hangers check joist locations. Screws placed off-center weaken support. Proper spacing avoids sagging.
Window and door installation hinges on jamb depth. Too deep or shallow affects weatherstripping. Seals fail if off by 1/16”.
Thus, 1/16 on a tape measure impacts nearly every trade. Mastery leads to cleaner, stronger, and longer-lasting results.
 Tips for Teaching Others to Read
Begin with visual aids. Print large-scale tape diagrams. Label each fraction clearly. Post them in workshops or classrooms.Use real-life examples. Show a board cut 1/16” too short. Explain how it affects fit. Make consequences tangible.
Break down the inch into sections. Teach halves first. Then quarters. Add eighths. Finally, introduce sixteenths slowly.
Hands-on practice works best. Give learners scrap wood and pencils. Have them mark multiple 1/16” points.
Color-code the lines. Use markers to highlight 1/4”, 1/2”, and 3/4” lines. This reduces confusion during early learning.
Create flashcards. Write fractions like 5/16” or 11/16”. Ask students to point to the correct spot on a tape.
Encourage verbal counting. Say “one-sixteenth, two-sixteenths…” out loud. Reinforce memory through speech.
Pair beginners with experienced mentors. On-site guidance builds confidence faster than solo study.
Test understanding regularly. Ask questions like “Where is 7/16?” or “What comes after 14/16?”.
Celebrate progress. Praise correct reads. Positive feedback motivates continued learning.
Teaching 1/16 on a tape measure strengthens entire teams. Skilled workers produce better outcomes.
How Lighting and Environment Affect Reading 1/16 on a Tape Measure
Poor lighting hides fine details. Dim garages or cloudy days make 1/16 on a tape measure hard to see. Shadows blur lines together.
Bright LED work lights help. Position them above the measurement area. Avoid glare on shiny surfaces.
Sunlight can create harsh contrasts. Backlighting makes the tape hard to read. Shield it with your hand if needed.
Rain or moisture smudges markings. Wet fingers smear ink. Dry the tape before use.
Cold weather stiffens tape blades. Retraction slows. Handle with gloves that allow dexterity.
Dusty environments coat the surface. Wipe the tape frequently. Carry a microfiber cloth.
Vibration from power tools blurs vision. Wait until the machine stops before reading. Rushing leads to errors.
Wearing safety glasses may distort view. Anti-fog coatings improve clarity. Choose lenses that don’t magnify.
Tight spaces limit access. Flexible tapes bend around obstacles. But curved sections stretch the scale. Avoid measuring on curves.
Always carry a backup tape. If one fails, another ensures continuity. Preparedness prevents delays.
Good conditions support accurate reading of 1/16 on a tape measure. Manage your environment for success.
 Frequently Asked Questions
What does 1/16 on a tape measure look like?
It’s the shortest line between inch marks. Sixteen fit in one inch.
How do I know I’m reading it right?
Count from the nearest inch. Match the number of lines to the fraction.
Is 1/16 the smallest unit on most tapes?
Yes. Some go to 1/32”, but 1/16” is standard.
Can I estimate 1/16”?
Not reliably. Use the actual mark for accuracy.
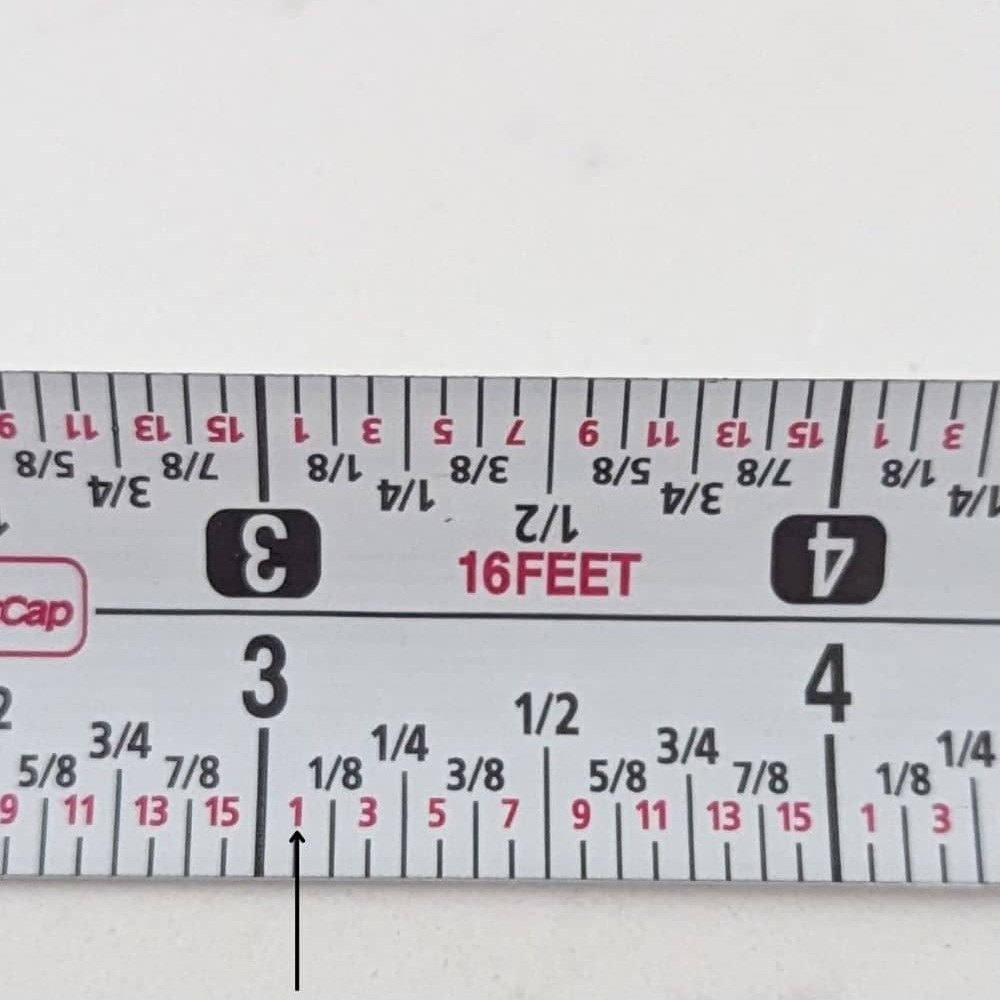
Why do some tapes have red numbers at 16-inch intervals?
For stud spacing in framing. Helps locate wall supports quickly.
Does the metal hook move?
Yes. It slides slightly to account for its thickness.
How do I prevent wear on the markings?
Keep the tape clean. Retract it slowly. Store it properly.
Can digital tools replace 1/16 on a tape measure?
They assist, but physical tapes remain essential for most trades.
Final Thoughts
The 1/16 on a tape measure may be small, but its importance is enormous. It forms the foundation of precision in countless trades and DIY projects. From framing a house to sewing a dress, this tiny increment ensures accuracy and professionalism.
Mastering it requires practice, patience, and attention to detail. Yet, once learned, it becomes second nature. Builders, crafters, and hobbyists alike rely on this standard to deliver high-quality results.
Technology continues to evolve. Digital tools offer new ways to measure. However, the traditional tape measure remains irreplaceable. Its simplicity, durability, and universal design endure.
And at the heart of its usefulness lies the ability to read 1/16 on a tape measure with confidence. Whether you’re a beginner or a seasoned pro, never underestimate the power of this smallest standard unit. In craftsmanship, the smallest details make the biggest difference.